Home
Overview
Task 1:
Framing & Composition
Task 2:
Response
Task 3:
TVC Production
Task 1:
Special Effects
Task 2:
Media Diary
Task 3:
Magazine Cover
Framing & Composition
Example
Welcome to Year 9 Media Arts
Swan Christian College has a strong tradition in media studies & our hope is this will continue as new students discover how understanding and creating media can not only be a great source of creativity but also contribute positively to society on a wider level.
At it's simplest media studies focuses on Story.
What makes a good story?
How do we tell good stories?
How do we understand the stories others tell?
Our goal is to teach you how to both tell good stories (through visuals and sound) and understand the stories others are telling through the various media forms in our culture (web, print, TV, film, games).
The Media Arts curriculum is built around the two interrelated strands, Making and Responding.
Essentially this means you will spend half of your time in this course making media productions (photography, filming, editing, sound design, Photoshop etc), and the other half discussing and responding to professional media productions.
We will discuss the social, cultural, and ethical implications of the media in our society through a variety of interesting response tasks throughout the course.
In these tasks we will also discuss media productions that represent other cultures and traditions exploring a wide variety of storytelling styles.
We are pleased you have chosen this course and believe you will achieve a high degree of satisfaction from pursuing media studies here at Swan Christian College.
Setting up - Media Drive
Before you start anything!
A big part of Media Production is being organised!
You will need to create a '9 Media' folder on your desktop. This is where you will store all your personal work for the year.
Within your '9 Media' folder you should create folders for:
- Semester 1 > Task 1, Task 2, Task 3
- Semester 2 > Task 1, Task 2, Task 3
Storing your work in the correct place all the time is very important so that all of the students in your group can access projects all the time. You must label your work properly - sometimes students lose work because they don't name files correctly or it is accidentally deleted or not saved before logging off.
As a media student you will have special privileges which you need to work responsibly with. 
You will have access to the 'media drive' to backup and share your work:
- You will keep all your personal media related task work there in a folder called 'your name'.
- You will have 'group folders' where you store your group work. When a person in your group creates a group folder, they need to tell the teacher so special permissions can be created to make it available to all your group members. All group work needs to be kept in this folder, so if one person is away, the others can still work effectively.
Accessing the Media Drive:
- On your desktop open the 'media drive' folder. (If it's not on your desktop, click on the 'little green man' in your dock first).
- Navigate to your 'teachers name' folder
- Open the Year 9 Media folder
- Open the folder according to what Task you are working on e.g. 'Task 1' folder
- Create a new folder there called 'your name' or 'your groups names' (include first and last name)
Overview
Semester 1
Semester 2
Task 1 - Framing & Composition
The act of choosing what to include in your frame and the way you compose the elements within your image is fundamental to telling effective stories in media studies. If you enjoy photography you might already be familiar with some of the concepts we will be covering in task 1.
Part A - (Making)
In this task you are required to tell a simple story using a variety of shot sizes and compositional techniques.
This task is to be completed with a still digital camera (or a mobile phone camera).
You will be assessed on your ability to use a variety of shot sizes that create a sense of continuity and coherency when viewed in order (remember to use a variety of shot sizes). You will also be assessed on your ability to create a sense of depth and interest in your frame by employing the concepts that have been discussed (rule of thirds, use of foreground elements, leading lines etc).
Choose 1 narrative story from the list below:
Story 1 | ComputerA person is sitting at home in front of a computer deep in thought. They do a web search typing 'what should I buy the person who has everything?' The person patiently waits for the results. It is taking a long time and they look at the clock on the wall obviously getting quite anxious. The page gets painfully close to loading and we see the persons face turn from frustration to confusion as the search results finally appear. It is a blank screen that simply says 'nothing.....but you need a new computer!!'. The person laughs.Story 2 | DetentionA bored student sits in class as the teacher writes on the board. The student receives a message on her phone saying “meet me at he drink fountains”. When the teacher is not looking the student sneaks out of the room and runs to the drink fountain. Turning the corner the student stops in her tracks at the drink fountain with a shocked expression on her face. The teacher is standing there with his arms folded and shaking his head. The teacher hands the student a detention slip.Story 3 | LateA stressed student arrives at school and quickly drops off her bag at the bag rack. She looks at her watch and walks into the bathroom to do her hair. She tries a variety of hairstyles obviously getting frustrated that she cannot get her hair looking perfect. She is so busy doing her hair that she does not realise the siren has gone. Finally she gets her hair perfect but realising she is late runs to class. As she runs her hair gets horribly messed up and as she arrives late she sees her reflection in the class window and is horrified.Story 4 | Sleepy EssayA teacher stands at the front of the class and tells them they have a major essay due the next day on the topic of sleep. The students looked shocked and upset at this news. One of the students is now sitting on their computer at home trying to complete the assignment. They are almost finished but it is getting late and they are obviously getting tired. They cannot fight it any longer and as their head hits the keyboard the assignment is instantly deleted. The scene ends as the student moves their head and hits the z key. The screen fills with zzzzzzzzzzzzzzzzzzzzzzzzzzzzzzzzzzzzzzzzzzz.
You are permitted 10-15 still shots to tell your story and must complete a detailed shot list before shooting your stills. Download shot list
For a detailed example of a completed Task A and shot list, see 'example' tab.
Part B - (Responding)
In this response task you will view and analyse the scene below (Hospital Intro for "The Ticket") and complete the following worksheet
Task 2 - Advertisement Response
In this task you will be working in groups to produce an advertisement for one of the companies from Task 1.
It will require pre-planning before filming, producing and editing your final advertisement using Premiere Pro.
Part A
Click here and read through the LESSONBUCKET information on advertising then complete the Activity and Study questions in a MS Word document.
You must complete all the questions over 2 lessons
Part B
In this task you will analyse a professionally produced commercial and work through a response worksheet.
- Choose one of the TV commercials (TVC) below
- Complete the worksheet.
Task 3 - TV Commercial Production
In this task you will be working in groups of 3 of 4 to produce an engaging and entertaining TV Commercial based around a chosen product or service to appeal to a specific target audience.
Your commercial must be 30 seconds in length and use the conventions typical of the television commercial genre.
You will be assessed on how well you demonstrate your understanding of framing & composition and camera movement taught earlier in the semester.
Before beginning this task you need to plan out your TVC using the Pre-Planning Booklet to complete:
- written treatment for the TVC
- detailed design proposal
- detailed shot list
- storyboard (will be supplied by your teacher)
Choose 1 product or service from the list below:
- Sunblock
- Deodorant
- Washing Powder
- Soft Drink
- Bread
- Plumbing Company
- Delivery Service
- A Charity
- A Toy
- Bank
- Insurance Company
- Medical Services
Choose a target audience from the list below:
- Senior Citizens - Male
- Senior Citizens - Female
- 35 - 55 Male
- 35 - 55 Female
- Primary School Girls
- Primary School Boys
- Young Mothers
- University Students
- New Home Owners
- High School Students
You MUST complete your pre-production planning before filming. NO PLANNING = NO FILMING!
Examples of TV commercials from past students:
Task 1 - Special Effects
In this task you will be working individually to produce a short 3 shot special effects sequence in Adobe After Effects.
You will storyboard your own 3 shot sequence, breaking down the multiple scenes you need to composite into your images. Here is some inspiration from last years Year 9s.
As special effects animations can be time consuming you must be highly organised and prepared as you undertake this project. Please follow these procedures:
(1) Research the effect you want to create, finding an example in some professional media. Check with your teacher that your idea is achievable.
(2) Draw storyboards of each of the 3 shots and then if the shot is composite (more than one image combined), storyboard each part of the shot.
(3) Prepare any props, costumes or elements you require to help create an authentic setting
(4) Film your shots using the video cameras.
(5) Import and compile your shots into the After Effects timeline. Apply any relevant effects and animation.
(6) Grade your 3 shots using Adobe Speedgrade presets.
(7) Finalise and export your video.
(8) Provide to teacher with your sound effects attached that were created in Logic Pro X.
Creating effects and animating your scenes will be the most time consuming part of this project (and technically demanding) so watch the process videos at your own pace to learn how to animate in After Effects. (Check out the Tutorials for After Effects linked at the top of the page).
Task 2 - Media Diary
In this task you are required to keep a diary for 7 days recording all of your media consumption.
This is to be a comprehensive record of every media form you are exposed to over the course of the week, including:
- Time spent Facebook, Instagram and other social media
- Time spent on console gaming
- Time spent on mobile gaming
- Time spent watching Television
- Time spent watching feature films at the cinema
- Time spent on video sharing sites (such as YouTube)
- Time spent reading print magazines or newspapers
- Time spent on mobile devices viewing various media
- Time listening to commercial radio (i.e. in the car, at work etc)
- Time listening to music (list what medium you are listening through - i.e. Apple music, Spotify, soundcloud etc)
You will need to be diligent in keeping a record of your media intake - as much of it you will consume naturally without even thinking about it.
You need to be as accurate as possible understanding that at times it will be difficult (at these times an approximate time will suffice).


To keep you on track you need to:
- Inform your parents and family members that you are doing this task (they can help remind you to keep records)
- Take notes throughout the day recording specific media intake and fill out your diary at least twice daily - it will be very difficult to try and remember back over the course of a whole day what you did and for how long.
- Your parents must sign off on your diary at the end of the project to verify you have kept accurate records.
Once you have completed your diary we will complete a full class break down - noting differences, similarities and trends in our findings.

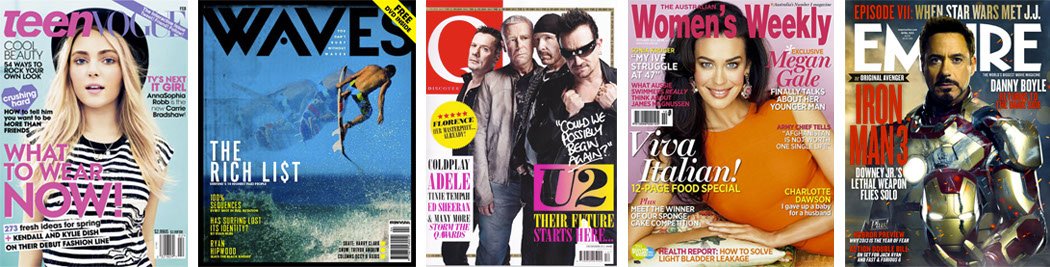
Task 3 - Design a Magazine cover
Magazine covers are produced en masse' every week and thousands of various titles fill the news-stands all over the world. There are a number of common codes and conventions used in the design and layout of these covers which we will discuss in class.
Using professional image editing software you will produce your own cover choosing from one of the following types of magazines:
- Womens Interest (Woman's Day, New Idea etc)
- Teen Magazine (Dolly, Teen Vogue etc)
- Surfing Magazine (Waves, Surfer etc)
- Other (you need to confirm with teacher!)
SPECS: Create an A4 document at 300 dpi in Photoshop (see tutorials below and/or 'Tutorials' link on how to use Photoshop)
Before you begin your design you must fill out the following information and submit to your teacher.
Photoshop Poster Tutorials:
Framing & Composition
Framing is the act of choosing what will be included within the frame of the cameras viewfinder - while composition relates to how the elements included within the frame are arranged to create an aesthetically pleasing image. Filming like all aspects of screen production involves a series of choices that will help determine a finished piece's effectiveness including:
- What part of the scene will I film?
- What elements will I include within the shot?
- Where will I place the camera in relation to the subject?
- What shot size will I use?
- How will I move the camera?
These questions can be overwhelming even for the most experienced media practitioners and therefore students must understand the foundational concepts of framing and composition before they begin filming.
Shot Sizes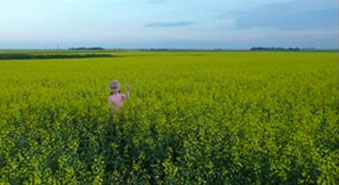 Extreme Long Shot Usually used as an establishing shot in a scene to give the viewer a broad sense of the world they are entering into. These shots can be so wide that the human element is often very small and sometimes indistinguishable - it gives the viewer a very broad picture of the scene.
  Long Shot The long shot it is still quite wide but the human element is clearlyvisible. Again this type of shot is often used to establish a scene.
 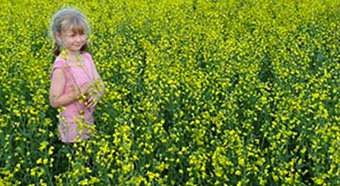 Medium Long Shot Characters can be seen from approximately the knee up. This shot gives the viewer a sense of the surroundings as well as the character and can often be used in scenes with a group of people interacting and also in action scenes.
 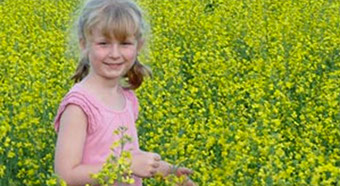 Medium Shot The medium shot would typically feature the characters waist to the top of their head. This is a good frame to use when introducing dialogue and is often used at the beginning of a conversation between two characters (two-shot) before cutting to close ups.
 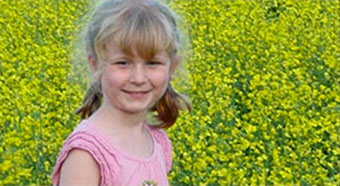 Medium Close Up The characters expression is much clearer in this shot and it can be used for a tight two-shot if the characters are in close proximity.
 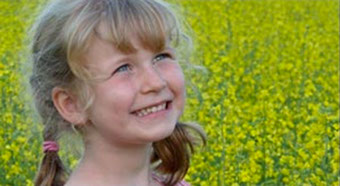 Close Up As the intensity and emotion of the scene increases a director will often choose to shoot individual close ups to capture the intensity of the characters dialogue and subsequent reactions.
  Big Close Up This type of shot can be used to show extreme emotions, acting as an exclamation mark in a scene if a point needs to be stressed. The big close up is not employed as often as the regular close up.
 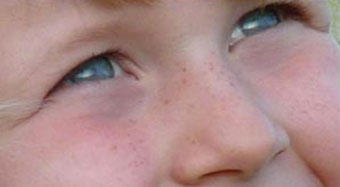 Extreme Close Up Used rarely but can be used effectively to create a sense of intrigue. Is also often used in cutaways to emphasize detailed character actions or focus in on a small object. Camera AnglesAs a general rule the camera will usually be positioned at the eye level of the main character/s. This helps the viewer enter the story at the characters level, thus helping them relate to the central characters on screen. However other angles are often employed to symbolise a characters internal feelings and their relationship to the other characters. High Camera Angles High camera angles can be used to make the character being filmed look inferior and powerless. This in turn gives the viewer a sense that they are in the position of authority looking down at the character (usually along with other more powerful characters). This in turn may serve to help the viewer empathize and feel for the powerless character. A higher angle can also be used to separate elements within the frame and create a sense of depth especially in wider angled shots.
  Low Camera Angles Low camera angles tilted up towards their subject can make the subject look dominating and powerful. This in turn places the audience in the position of being looked down upon and can add to the authority of the character on screen. Orson Welles famously took this to the extreme in Citizen Kane when he ordered his crew to dig a hole in the studio floor! This was so the camera operator could get lower than ground level to look up at Kane from the lowest possible angle making him seem as powerful as possible.
  Canted Angle (or Dutch Tilt) This is an off axis tilted shot that is sometimes employed to give a sense of a how a character is feeling on screen. It can be rather unsettling for the viewer and give them an unbalanced feeling which usually mirrors the inner turmoil of characters in the film. This shot is used (with just about every other technique explained on this page!) in a German film called Run Lola Run when she is frantically trying to save her boyfriend.
  Compositional TechniqueHow all the elements are arranged (or composed) within the frame by the camera operator is pivotal as to whether an engaging image will ultimately be produced. The decisions of what to include in the frame and what to omit, the height of the shot, the angle, the camera movement, the lens selection, the lighting, the aperture settings, the shutter speed settings and the specific decisions as to where objects of interest should be placed all play a role in the final shot produced. Although this may seem overwhelming at first, once understood the variety of creative opportunities available are exciting. Although there are no set 'rules' there are some widely accepted guidelines that will give beginners a solid foundation from which to develop their own style. The Rule of Thirds The rule of thirds is not a rule as such - it is a general guideline that if adhered to will usually give a well balanced picture. Students often fall into the trap of framing everything in the center of the frame with too much headroom (space between the subjects head and the top of frame). When everything is divided in two and framed in the center it can make for a very uninteresting image. It is much better to think in thirds. Firstly imagine the frame is divided into thirds horizontally and vertically - the rule of thirds states that objects of interest should be placed on the intersecting invisible lines. Sound confusing? It's not really - hover over the image below for a clearer picture:
 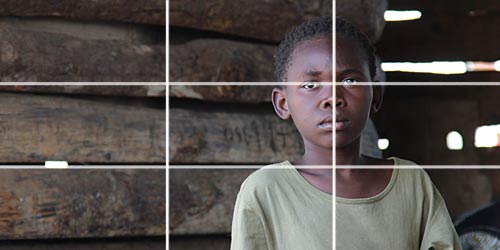 Use of foreground Images A great compositional technique that helps create a greater sense of depth in an image is to include foreground elements in the frame. In the image at the market below we get a greater sense of depth and the environment with the foreground fruit included in the frame. A shallow depth of field is created using a zoom lens and an open aperture (f 2.8) with the clear focus being on the shop owners eyes (notice the rule of thirds is being adhered to as well with the subjects eye line on the top horizontal third and face on the left vertical third). Even though we are working in a two dimensional medium we can create a sense of 3 dimensions using this technique.
 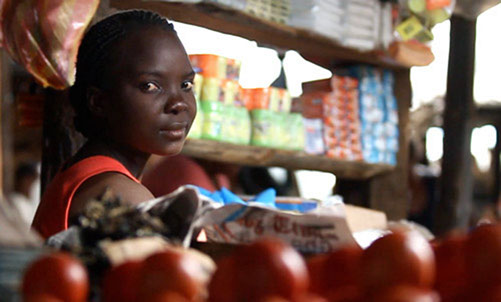 Depth of Field Another way to draw attention to a particular part of the frame is by using selective focus utilising the aperture settings on your camera's lens.This technique can be quite aesthetically pleasing and encourages the viewers eye to focus on a specific part of the frame.Simply put - lower f numbers (i.e. f1.8 to f4) will perform well in low light and create a shallower depth of field (separation between foreground and background elements). This particular shot was taken in a dark room with the aperture set to f1.8. If this was a video an effective technique would be to 'pull focus' and draw the viewers attention from the child in the foreground to the group of children in the background. Although it must be noted that using 'wide open' aperture settings on video can create focus issues as the subject will shift out of focus very quickly if they move.
  Leading Lines Another compositional technique used to draw the viewers eye across the frame and toward an object of interest is by using 'leading lines'.These can either be naturally occurring (see field below) or man made lines (i.e. architecture). These lines lead the viewers eye across the frame taking in the scene and landing on the desired point of interest. It is often a good idea to try and get the line to begin one of the corners of your frame. It can be seen in the image below that the viewer will enter the frame in the bottom left and follow the yellow line of flowers all the way to the old barn door.
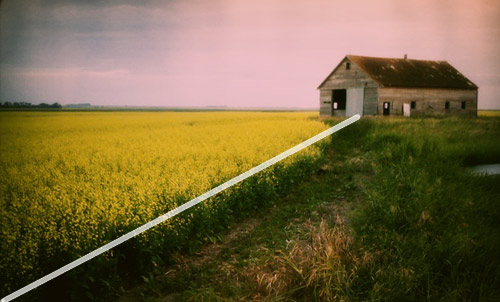
Task 1 - Example (Part A)
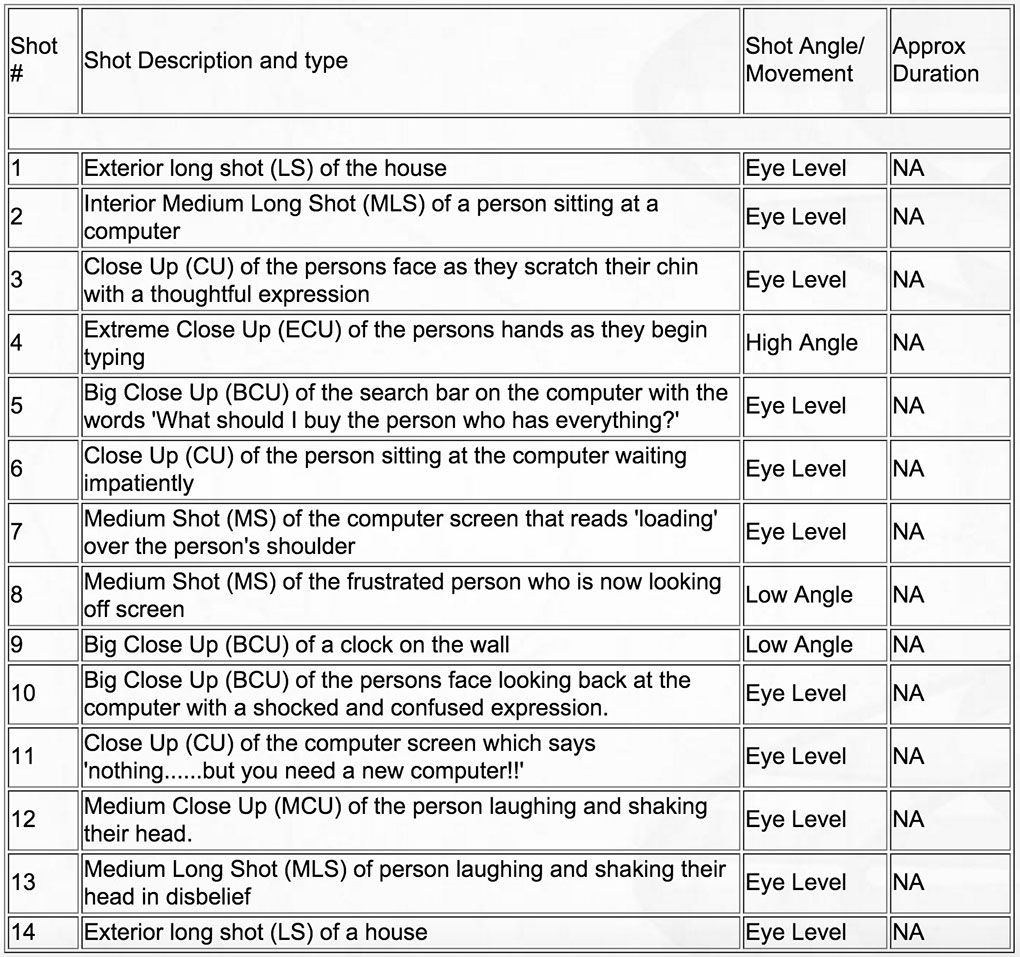
Story 1 - 'Computer' Example
A person is sitting at home in front of a computer deep in thought. They do a web search typing 'what should I buy the person who has everything?' The person patiently waits for the results. It is taking a long time and they look at the clock on the wall obviously getting quite anxious. The page gets painfully close to loading and we see the persons face turn from frustration to confusion as the search results finally appear. It is a blank screen that simply says 'nothing.....but you need a new computer!!'. The person laughs.

Shot List example:
Tutorials
Semester 1
 Swan Christian College - Media Department
SITE MAP
MEDIA TEAM
©COPYRIGHT - SWAN CHRISTIAN COLLEGE 2017
CONTACT

Semester 2