Create a simple mark-up document to specification
Practice
This series of practical activities will allow you to put together a simple HTML page using a basic text editor. You can use an application such as Notepad or WordPad (in Windows) or TextEdit or Simpletext (on Mac).
You may find it useful as you work to reduce the size of this browser window so that you can view the instructions side-by-side as you work.
Contents
Activity 1: Looking at HTML source code on the web
Activity 2: Create an HTML document
Activity 3: Save your document in the correct format
Activity 4: Preview your document
Activity 5: Using other basic HTML tags
Activity 6: Recognise common errors
Activity 7: Link documents
Activity 8: Insert an image
Activity 9: Keeping it all together
Activity 1: Looking at HTML source code on the web
HTML documents are really just plain text documents - like an email or a word processing document. The difference is that they contain code called "tags" that the browser uses to interpret how the page is structured and displayed.
Let's see what the TAFE home page looks like in plain HTML code. Follow these instructions:
In your browser, go to the TAFE home page: www.tafensw.edu.au
- Click on the "view" menu of your browser
- Click on "source" (or "page source")
- Scroll down past the tag <body> and look at the code there.
Activity 2: Create an HTML document
Open a basic text editor on your computer such as Notepad or Wordpad (in Windows Start Menu you will find this by going to: All Programs > Accessories) or TextEdit or Simple Text (on a Mac)
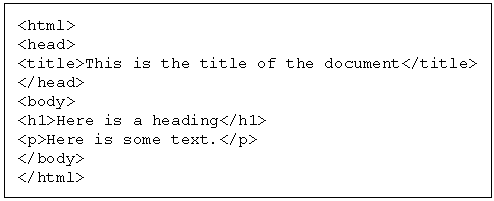
Type the following HTML text into the text editor (we will save the document in the next activity - so just leave the document open when you have finished).

Figure: Sample HTML code showing simple mark-up with title, heading 1 and paragraph.
Activity 3: Save your document in the correct format
Two key elements in creating a website are:
- using correct file formats
- setting up a folder structure for your site.
Go back to your text editor and do the following:
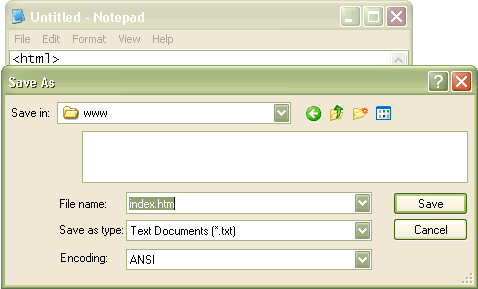
- Click on "File" then go to "Save"
- Create a new folder called "www" to contain all your HTML documents (create this on the Desktop)
- Name your file "index.htm" - do not forget the ".htm" extension (you can also use ".html")
- Click on "Save".
- Close your document
You do not have to make any changes to "Save as type:" or "Encoding:"

Screenshot of the process of saving the file as "index.htm"
Activity 4: Preview your document
- Find your file on your computer (on desktop in folder called "www" if following the directions above).
- You should be able to double-click on your "index.htm" file to open it in your browser.
- If it does not open in the browser (it may open in Notepad again), right-click (Windows) or control-click (Mac) and select "open with" - choose your browser.
Activity 5: Using other basic HTML tags
Once you have created your basic page structure, you can begin to add the content of your page. This might include headings, emphasis, and lists.
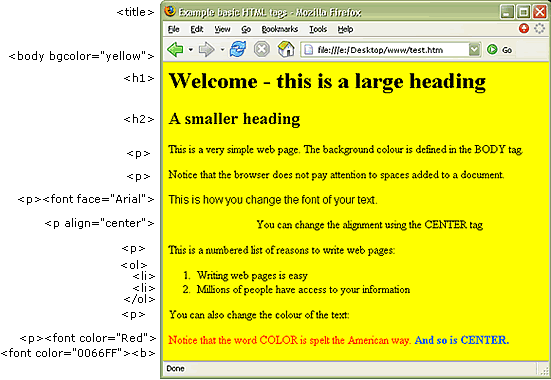
Here is an example of a page using a variety of basic HTML tags:

Figure: Screenshot of simple web page with HTML tags marked alongside
Using your text editor (e.g. Notepad or TextEdit) open your "index.htm" document again. Now try to create the HTML code that will produce the above web page (the yellow part). Try making the unordered list (ul) an ordered list (ol). As well as the Reading for this learning pack, there are many HTML reference sites on the web that can help you.
Activity 6: Recognise common errors
Take a look at the following HTML document then answer the questions.
<html>
<head>
Hello World
</head>
<body >
<h1>This is a very simple web page. Notice that the
browser does not pay attention to spaces that we add to our document unless you specify what
type of spacing you want.
<p>Like when you use a paragraph tag or a <br>
break line tag. </p>
<p>The end.</p>
</body>
</html>
Activity 7: Link documents
In this activity you will create a second HTML file with links.
- Open the HTML file that you created earlier in your text editor (e.g. Notepad or TextEdit). It should be called "index.htm"
- Click on File >Save As
- Type a new file name: "links.htm". Make sure that you save the file into the same folder (called "www") as your original web page "index.htm".
- Add the following new links to the page. Make sure you place them towards the end of the document but before the </body> tag. You can replace some of the text already on the page if you wish.
<p><a href="index.htm">Click here to go home</a></p>
<p><a href="http://www.tafensw.edu.au">Go to TAFE home page</a></p>
<p><a href="http://www.abc.net.au" target="blank">Click here for today's news</a></p>
<p><a href="mailto:bob@example.com">Click here to Email Bob now.</a></p>
Try inserting an "anchor link" that links to the top of the page. In the last line before the "</body>" tag, add the words "Go to the top of the page". Link this text to a named anchor (call it "top") at the top of the page above the first heading (but after the <body> tag).
- Save the document
- Test the document in your browser.
- Change the fake email address "bob@example.com" to your own to test that the email link works.
Activity 8: Insert an image
For this activity, use the simple HTML page you created previously called "index.htm".
First go to the folder (should be "www") on your computer where you created your HTML pages. Create a new folder inside the "www" folder called "images". You should always create a folder like this to hold your website images.
Select an image to put into your web page. You can find one at FreeFoto: www.freefoto.com. For the purpose of this exercise, make sure it is a JPG image.
To download an image:
- Find an image that you like on FreeFoto
- Right mouse click on the image (CTRL-click on Mac)
- Click on "Save Picture As" (or "Save Image As")
- Rename the file to "picture1.jpg" (do not forget the .jpg extension)
- Save the file into your "images" folder.
Using the <img> tag, place the image into your HTML document as follows:
<img src="images/picture1.jpg">
Activity 9: Keeping it all together
By now you should have a mini website. Your "www" folder should contain at least two HTML documents "index.htm" and "links.htm", plus an "images" folder. How would you email this website to someone else?
You need to "archive" your website into a single compressed file to send it via email.
The most common archive format is ZIP files. For Windows, use WinZip (www.winzip.com) on Mac use Stuffit (www.stuffit.com) or else some ZIP functionality is built into Mac OSX.
Explore the use of the Zip application by taking the "www" folder and creating a new archive file called "www.zip". Take this to another computer either via email, USB flash memory stick or on CD. Extract your "www" folder and check to see if your links still work on the second computer.