click to print this page  
The five-minute guide to using hand-held microphone

What type of micshould you use?

If you’re going out recording with almost any type of portable recorder, you’ll need a microphone. For interview work, go for a mono mic. You can use a stereo mic for recording atmos/wildtrack and actuality, but if you want to record voices in stereo, you need to think carefully about how many mics you will need and where you’re going to place them.

mic plugged into a minidisc


Types of mono mic :

Cardioid mics

  • These mics are directional, and they’re more sensitive to sounds coming from one particular direction, often the front of the mic.
  • Cardioid mics are good for favouring one sound while rejecting another from a different direction, but you need to know what you’re doing.
  • If you’re just starting out, take an omni mic. It’s the most flexible, and cardioid mics need more careful use.
Cardioid mic

Omni-directional mics

  • An omni is an omni-directional mic, meaning it picks up sounds from all directions.
  • It’s a good general purpose mic, particularly useful for interview work, but also good for recording atmos and actuality. Many a package has been made using only an omni mic.
Omni-directional mic

The Cardioid mics and Omni-directional mics are the most common types of mic - but you’ll also come across these…


Gun mics
  • Useful for recording more distant sounds, e.g. a voice on a stage or the speaker at a press conference.
  • Your gun mic should come with a grip or stand.
gun mic

Clip mics
  • Often used in TV as they’re less obtrusive. Clip mics are usually small omni mics, and come in a box. There are a variety of sizes, but they’re all small enough to clip on to clothing.
  • Where you clip the mic is very important - too far from the voice and it will sound distant; too close to the chin and it can sound muffled.
  • You need to consider your interviewee’s clothing - taffeta and other stiff fabric will rustle. And if you clip a mic to a man’s shirt, make sure that his tie doesn’t fall across the mic.
  • Clip mics have their uses but hand-held mics will generally give you a better sound.
clip mic


The mic and its accessories

As well as your mic, you will need:

mic
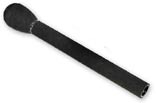
A windshield: often a foam cap which covers the business end of the mic. The windshield minimises wind noise on location. windshield
A lead: connects your mic to your portable recorder. Before you set off, check you’ve got the correct lead with the right connections for the portable recorder you’re using. lead
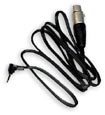
Batteries: some mics need to be powered by a small battery. Check before you leave and replace if you’re in any doubt about how old the battery is. If you’re going to be spending a long time on location, take spare batteries. battery
Cans: Don’t forget…a mic will pick up noises that you may not hear - or that your brain tends to filter out. So always wear cans (headphones) when you’re recording.


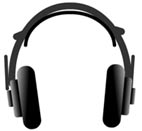
How to hold your mic

Do:
  • Hold the mic firmly but comfortably, and well away from the connection at the bottom
  • If you’re recording a lengthy interview, you may want to rest your mic-holding arm on a chair or table
  • Support the lead so that it doesn’t sway or knock against chairs, tables, yourself etc.
  • If you’re using a clip mic on an interviewee, check the mic position isn’t recording rustle from clothing

holding mic in the correct position

Don't:

  • Let rings or bracelets knock against the mic or the lead
  • Grip the mic too hard - your hand will go numb and may start shaking. If your arm does start to feel tired (and it will), simply ask the interviewee to pause for a moment, and swap to the other arm/hand.
  • Twizzle the mic in your hand as you use it - this will cause mic bumps
holdinc mic too near the bottom


Hearing what your mic will hear

Indoor objects:

  • If you’re inside, listen for the noises of air conditioning, clocks, the hum of electrical equipment, distant toilets, music or traffic, lifts, etc. These can cause you editing problems later on. Ask if electrical equipment can be switched off or clocks moved - but don’t do this yourself, just in case any accidents occur. Check you’re not on a airport flight path.
  • Computers, mobile phones and fluorescent lighting may cause RF (radio frequency) interference. This will give you an unwanted buzzing, clicking or humming sound.


indoor objects which make noise

What kind of room are you in? :
Large rooms (like halls, churches etc) can be very reverberant, giving you a bathroomy sound to your interview. You can cut down on this boomy sound by holding the mic closer to your interviewee’s mouth. (But beware of ‘popping’.) You could also try to find a smaller room - even a cupboard may give you a better sound


  • If you have to do your interview in a large reverberant room or hall, don’t do your interview near the centre of the room.
  • Try to move to the side but not a corner (which would give you a boxy sound).
  • Don’t stand too close to the wall, or you’ll pick up too much reflected sound.
  • Closing the curtains (if there are any) will cut down the reverberation in a large room.


interviewing in a large room
Outside:
If you’re outside, find a sheltered location if possible to protect the mic from wind noise. Rain will make a noise if it hits the mic. (In fact, water and any technical equipment don’t get on together.) If you’re near traffic, choose a side street rather than a main road. A car makes a useful temporary studio if the weather or traffic noise is awful.
interviewing outside in heavy traffic


Where to position your mic

Exactly where to place your mic depends on what kind of mic you’re using - but here are some general rules:

In a quiet location and using an omni mic, hold the mic about 6-8 inches/150-200 cm from the voice (yours or your interviewee’s). If you want use your voice and your interviewee’s, they need to be the same level,. You will achieve by one of two ways:

  • In a quiet location - find the midway point between you and your interviewee and hold mic there (or slightly nearer the quieter voice)
  • In a noisy location - move the mic between you and your interviewee as you take it in turns to speak, but beware of mic noises that may be caused by the movement of the mic and the lead.


You can, of course, record your interview sitting, standing or walking. You always want to get as close as you can to your interviewee, without imposing on their space. It’s better to sit or stand slightly to one side rather than directly opposite, which can feel confrontational.


Avoiding ‘popping’ and other mouth noises:
If you hold the mic too close to some interviewees, you’ll get a nasty ‘popping’ sound caused by the blast of air on plosive syllables (b/p) hitting the mic. This is not a problem you can completely cure by editing, so avoid popping by

  • Always wearing cans so that you’ll hear it when it occurs
  • Angling the mic to one side of the popping person’s mouth.


The nervous interviewee may have a dry mouth which makes clicking or smacking noises when they speak. Give them a drink of water.


Mic positions and controlling levels
Often you’ll need to do more than simply set levels and let the recording run.
Here are some common problems and their solutions…


Problem 1:
Recording an interview in a noisy environment (e.g. busy street, sports event, press conference) and trying to get a good level on the speaker/interviewee above the background noise


  Solution 1:
Position the mic closer than usual, but be very careful to avoid popping. Set your level with the mic in this position.
Problem 2:
Recording both a quiet and loud voice - and getting the balance of levels right
  Solution 2:
So that you’re not constantly fiddling with the levels, set your level against one of the voices and then position the mic so that it is nearer to the quiet voice and further away from the loud voice

click to print this page